

Credential Manager เป็น Jetpack API ที่รองรับการ Sign in หลากหลายวิธีของ Kotlin ไม่ว่าจะเป็น username and password, passkeys หรือจนกระทั่งปุ่ม Sign in with Google สำหรับบทความนี้เราจะโฟกัสวิธีอย่างหลัง
Google Cloud
ต้องมี Google cloud นะ โดยสมัครได้ที่นี่

ไม่ฟรีนะ ตอนสมัครจะให้ผูกบัตรเครดิตด้วย แต่จะไม่หักเงินเราอัตโนมัติจนกว่าเราจะยินยอม และให้ใช้ฟรีก่อน $300
เมื่อสมัครเสร็จแล้วให้เข้าลิงค์เดิมที่อยู่ก่อนหน้าได้เลย และทำเช็คลิสต์ตามนี้
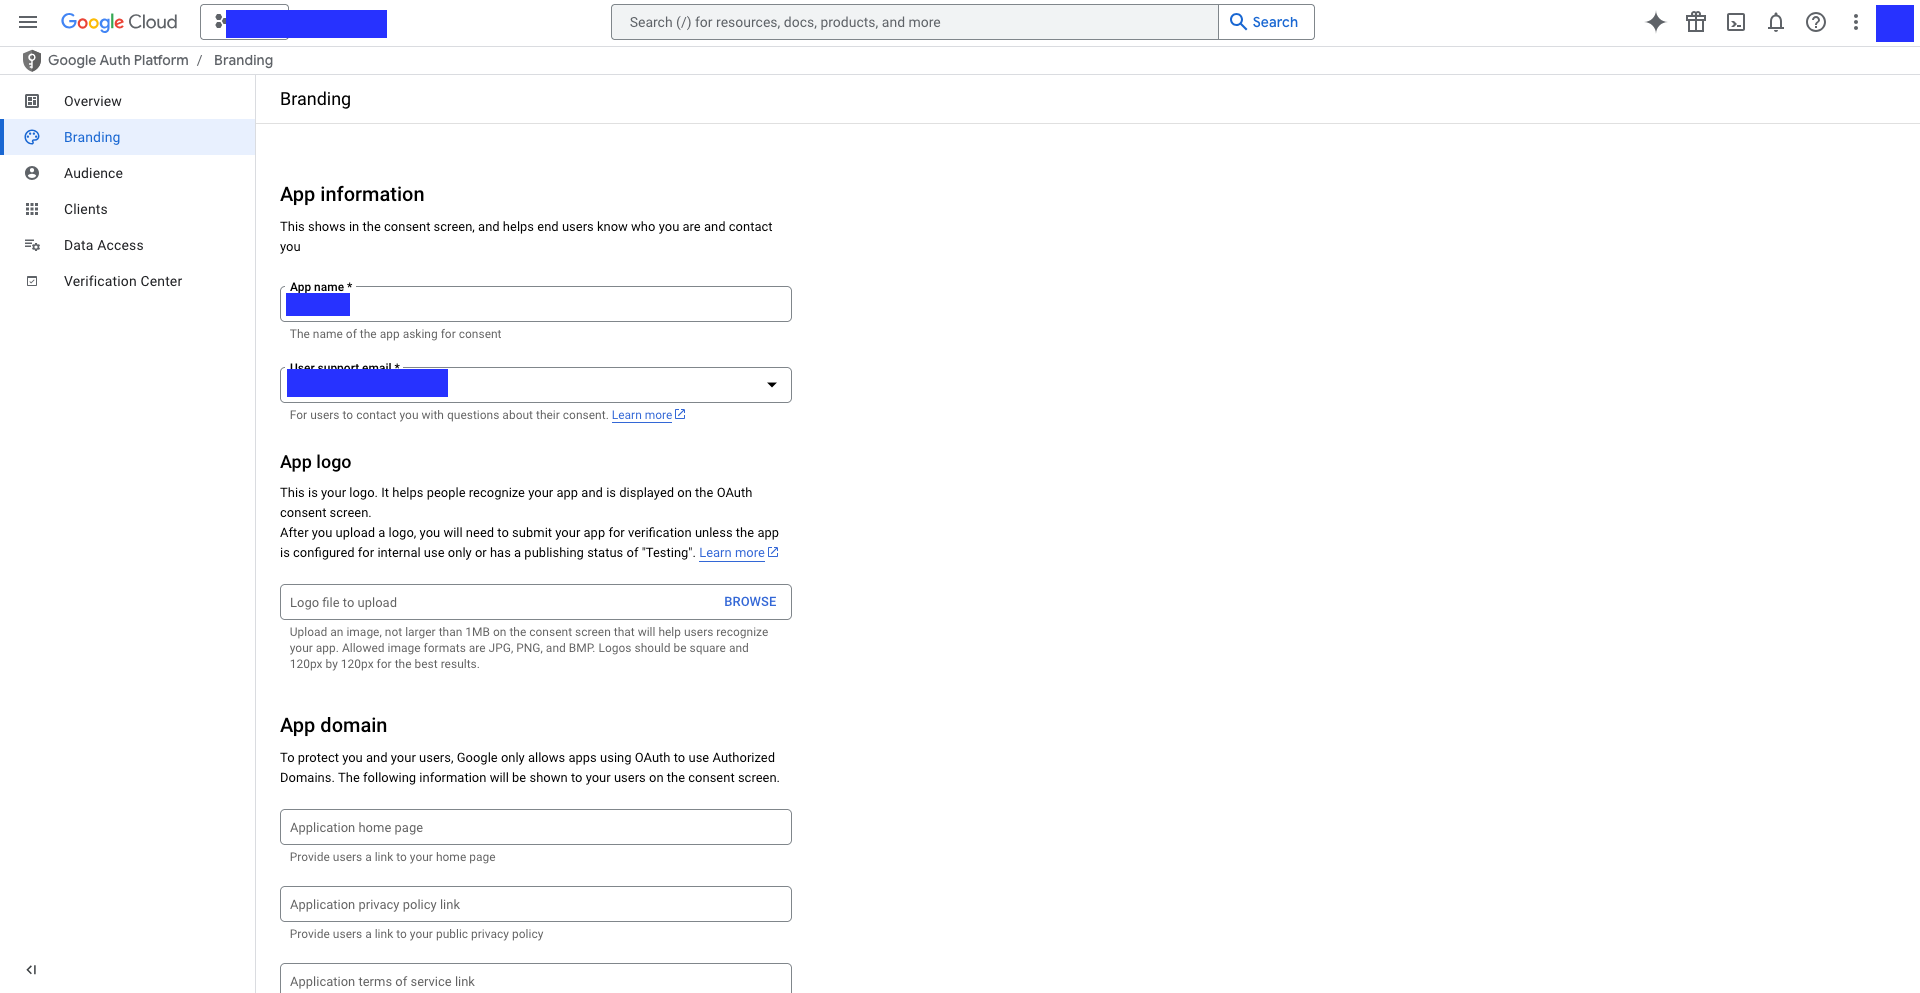
- คุณต้องไปอัพเดทข้อมูลที่ Branding
- คุณต้องสร้าง Client โดยไปที่เมนู Clients และคลิกที่ปุ่ม CREATE CLIENT
ตรงหัวข้อ Application type* ให้ระบุ Android
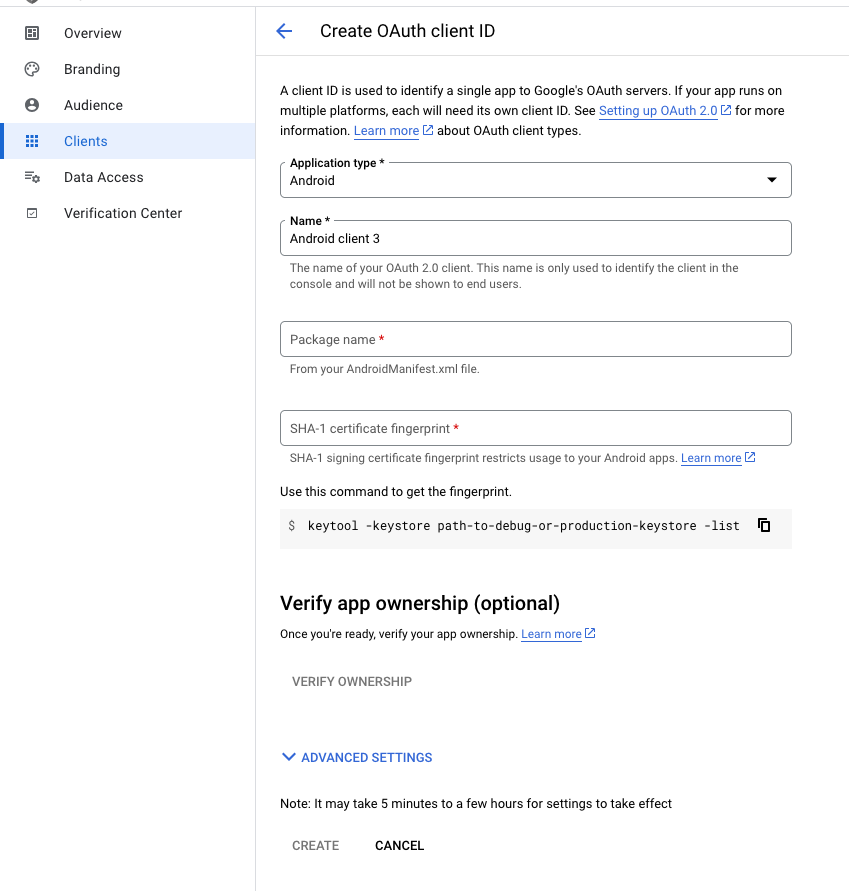
จากนั้นตั้งชื่อ Name, Package name, SHA-1
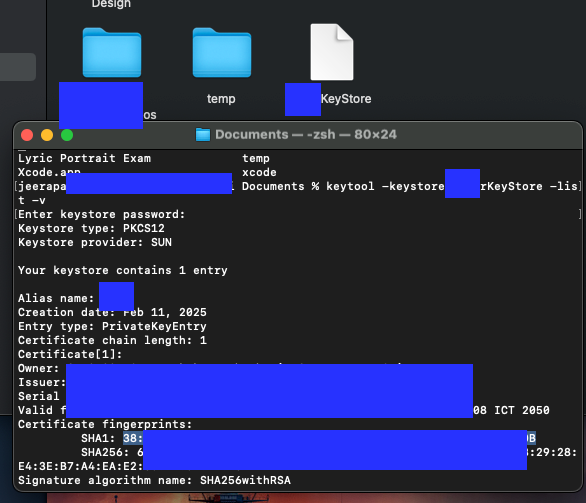
โดย SHA-1 เอาได้จากการใช้ command ใน Terminal
foo@bar:~$ keytool -keystore path-to-debug-or-production-keystore -list -v
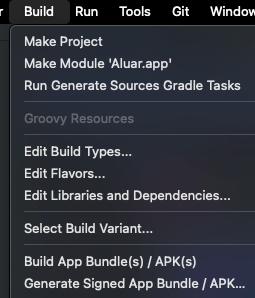
ส่วนไฟล์ keystore สร้างได้จาก Android Studio โดยไปที่เมนู Build -> Generate Signed App Bundle/ APK...
จากนั้นเลือก Android App Bundle และคลิกปุ่ม Next -> Create new...
กรอกข้อมูลลงไปให้ครบ และคลิกปุ่ม OK
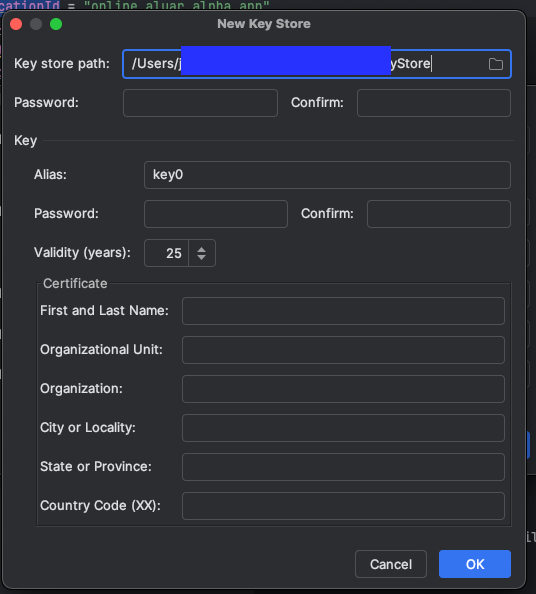
จากนั้นให้ไปหาไฟล์ และเปิด Terminal ใช้ command ที่ได้เขียนไว้ก่อนหน้า
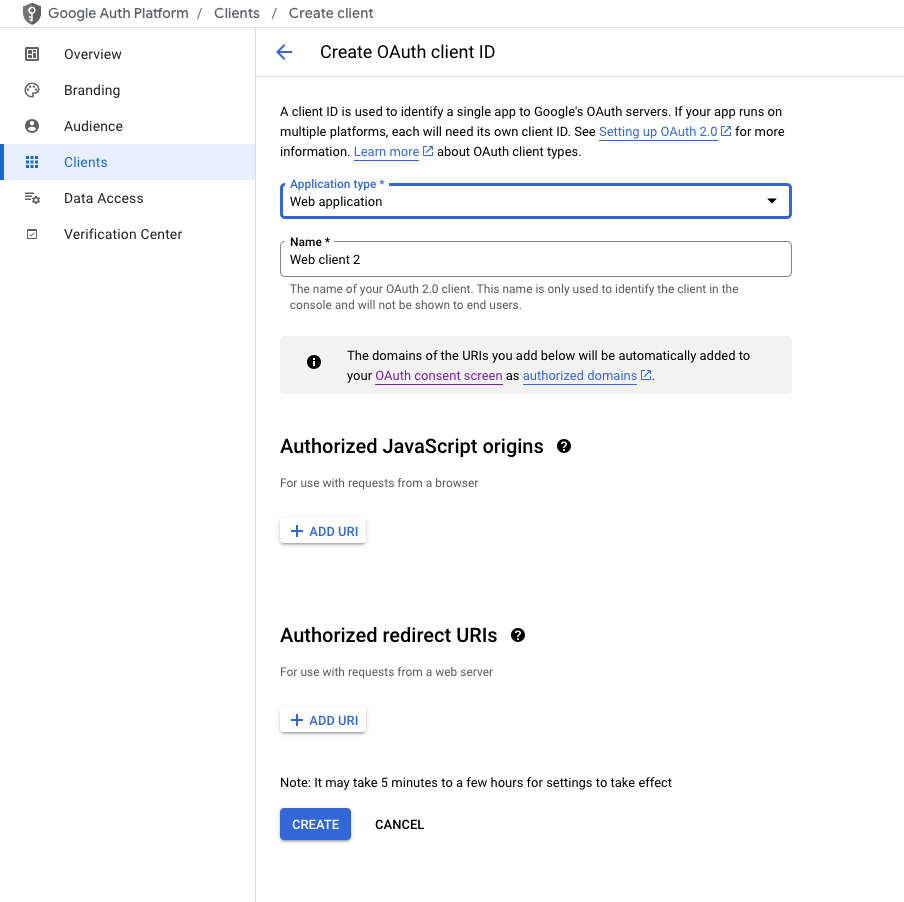
- ที่ Google Cloud Console คุณต้องสร้าง Client อีกอัน ที่ Application type* เป็น Web application และคลิกปุ่ม CREATE ได้เลย
มาเริ่มกันเถอะ
ในส่วนของ build.gradle (Module: app) ให้เพิ่ม dependencies
dependencies {
  // ... other dependencies
  implementation "androidx.credentials:credentials"
  implementation "androidx.credentials:credentials-play-services-auth"
  implementation "com.google.android.libraries.identity.googleid:googleid"
}
สร้าง Google sign-in request
ก่อนสร้าง Google sign-in request เราต้องสร้าง GetGoogleIdOption กันก่อน เพื่อรับ Google ID Token ของผู้ใช้ (Google ต้องการจ้า 😅)
val googleIdOption: GetGoogleIdOption = GetGoogleIdOption.Builder()
                .setFilterByAuthorizedAccounts(true)
                .setServerClientId(BuildConfig.GOOGLE_CLIENT_ID)
                .setAutoSelectEnabled(true)
                .build()
setFilterByAuthorizedAccounts(true) จะเช็คว่ามีบัญชีไหนบ้างที่สามารถ Sign in กับแอพเราได้ แต่ถ้าหากไม่มี Google แนะนำให้เราใช้ .setFilterByAuthorizedAccounts(false) เพื่อให้ผู้ใช้สมัครสมาชิก ศึกษาได้จาก

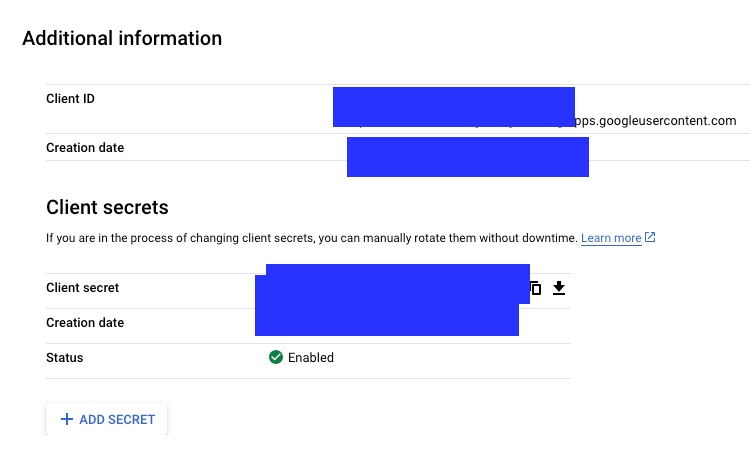
ส่วน .setServerClientId(BuildConfig.GOOGLE_CLIENT_ID) เราต้องใส่ตัว Client ID ที่เราได้สร้างไว้ที่ Google Clould Console โดยไปที่เมนู Clients เลือก Client ที่มี Type เป็น Web application
และให้ copy ตรง Client ID ไปใส่
ส่วน .setAutoSelectEnabled(true) จะเป็นการ Sign in อัตโนมัติ เมื่อผู้ใช้งานมีบัญชีเดียวที่เคยได้ Sign in กับแอพเอาไว้แล้ว, ไม่ได้ Signed out และไม่ได้ปิด Sign in อัตโนมัติที่ตั้งค่าบัญชี
เราจะสร้าง GetCredentialRequest โดย
val request: GetCredentialRequest = GetCredentialRequest.Builder().addCredentialOption(googleIdOption).build()
val credentialManager = CredentialManager.create(this)
เมธอด addCredentialOption() สร้าง Credential
coroutineScope.launch {
    try {
        val result = credentialManager.getCredential(
            request = request,
            context = baseContext,
        )
        handleSignIn(result)
    } catch (e: GetCredentialException) {
        showToast(e.errorMessage)
    }
}
getCredential() หา Credential ของผู้ใช้ที่ใช้งานได้ โดยต้องเรียกเมธอดผ่าน kotlin coroutine
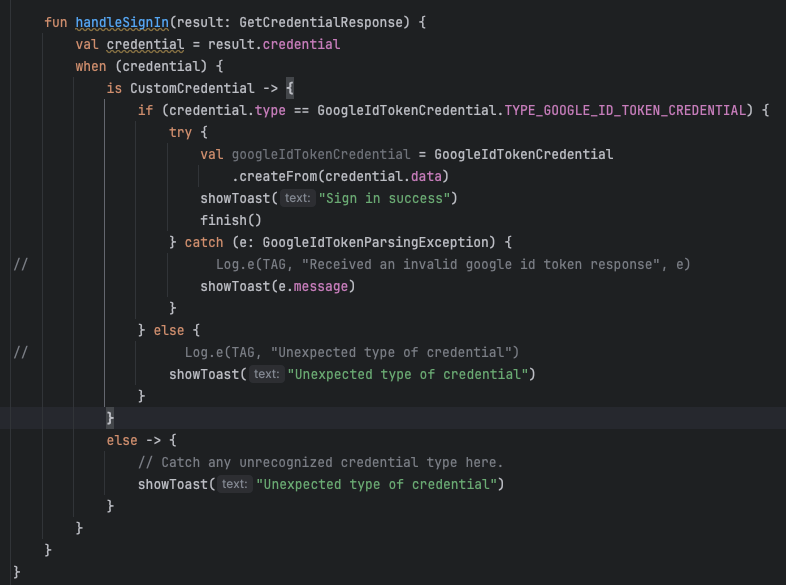
และนำ result ไปใช้งานต่อในเมธอด handleSignIn()
coroutineScope.launch {
    try {
        val result = credentialManager.getCredential(
            request = request,
            context = baseContext,
        )
        handleSignIn(result)
    } catch (e: GetCredentialException) {
        showToast(e.errorMessage)
    }
}


Discussion